Temperature mapping of a pharmaceutical warehouse — a practical guide
Pharmaceutical warehouse temperature mapping step by step: when to map, how to lay out the sensor grid, what to analyse and how to move to monitoring.
Zespół Nextriv4 min read
Warehouse temperature mapping is a study that answers a simple but inconvenient question: does the temperature across the entire space really stay within the declared range — or only in the vicinity of the one thermometer by the door? In a pharmaceutical warehouse the difference between the warmest and the coldest spot can reach several degrees, and a single sensor will never show it. Good Distribution Practice requires mapping before rooms are taken into use, and the outcome of the study decides where the sensors for permanent monitoring will later go. This guide walks you through it step by step: when to map, how to lay out the measurement grid, what to read from the data and how to move smoothly to continuous oversight.
What warehouse temperature mapping is and why you do it
Warehouse temperature mapping is a documented study of the temperature distribution (and often humidity too) throughout the entire volume of a room, run for a defined period using a dense grid of deployed sensors. The goal is twofold:
- Find the extreme points — the warmest and coldest spots, the so-called worst case. These define the real risk to the stored medicines.
- Prove uniformity — demonstrate that even at the worst point the temperature does not leave the storage range (e.g. 15–25 °C for a dry warehouse, 2–8 °C for a cold room).
Without mapping it is hard to defend the claim that one thermometer at the entrance represents conditions in the whole warehouse. With mapping you know where it actually gets hot — near the ceiling, close to the gates, above heat sources — and that is where you direct your attention. It is the foundation of the entire documentation set we described in our guide to GDP and temperature monitoring.
When to perform the mapping
Mapping is not a one-off ritual. It is repeated in several situations:
- Before commissioning a room or chamber — the baseline requirement.
- After changes to the racking layout or the heating and ventilation (HVAC) installation, after refurbishment or relocation of the gates.
- Seasonally — at minimum a summer and a winter variant, because the temperature distribution in summer and winter can be completely different.
- Periodically — according to your risk assessment, at intervals driven by how stable the facility is.
The study should run long enough to capture a full working day of the warehouse, including gate openings, defrost cycles and the daily HVAC swings — in practice usually 24 to 72 hours of continuous recording.
How to deploy the sensors — the measurement grid
The number and placement of sensors follow from the volume and geometry of the room. Rules that hold up in practice:
- Three height levels — at floor level, at storage height and below the ceiling. Heat collects at the top, cold settles low.
- Points suspect by default — corners, the vicinity of gates and docks, the neighbourhood of heaters, air supply outlets and sun-exposed external walls.
- A regular grid — the remaining sensors spread evenly, so that no larger area is left unmeasured.
- A reference point — a sensor where the permanent monitoring will eventually sit, to compare it against the extreme points.

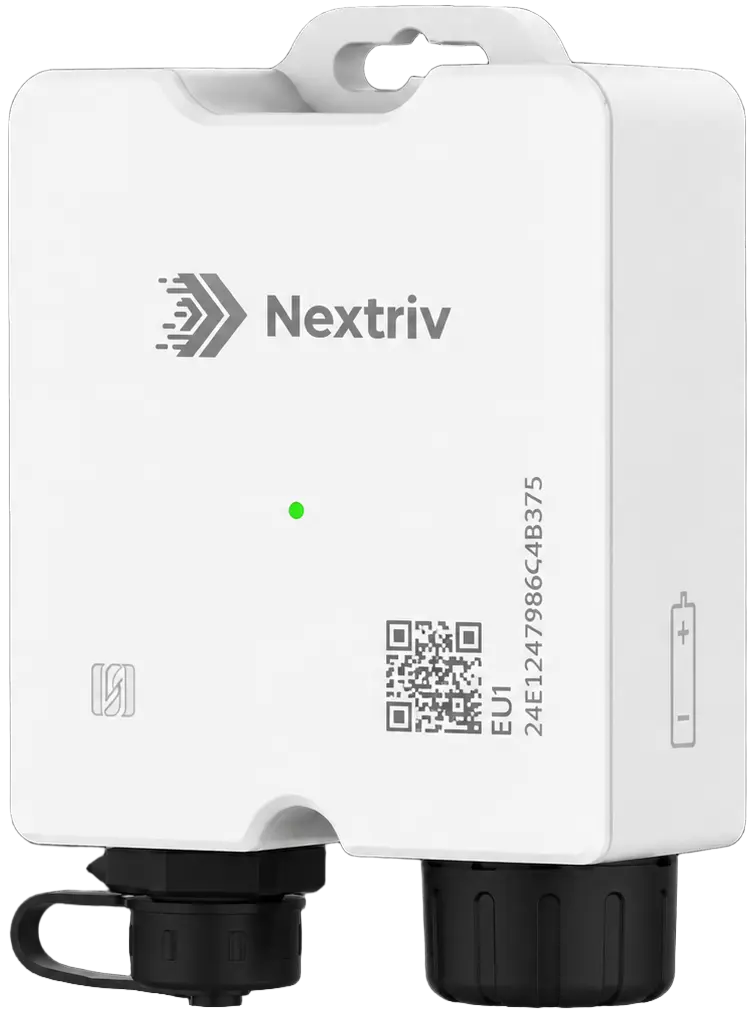
A sensor that is easy to place and relocate without cabling is ideal for the study. Nextriv Sense Industrial offers ±0.2 °C accuracy, EN 12830 certification, an enclosure just 18 mm thick and a magnetic variant — you fix it to a rack or column in seconds and move it to a new spot once the study is done. A local log of 3,000 time-stamped measurements and long-range radio connectivity mean no grid point is left without a record, even if the gateway sits at the far end of the hall.
What to analyse in the collected data
Once the study is over, what counts is not individual readings but the statistics from every point:
- Minimum, maximum and average for each sensor — you immediately see which point runs hottest and which coldest.
- Spread between points — how large the difference is within the same zone.
- Response to events — what happens when a gate opens, during a defrost cycle, in the hottest hour of the day.
- Mean kinetic temperature (MKT) — pharmaceutical analysis often calculates it alongside the plain average to account for the impact of fluctuations.
The Nextriv platform makes this analysis easier: Min/Max/Avg widgets summarise every point, the sensor comparison widget puts them on a single chart, and continuous aggregates (1 min / 5 min / 1 h / 1 d) let you change resolution smoothly without losing detail. You can export the raw data to XLSX or CSV if you run the analysis in your own spreadsheet or validation report.

From mapping to permanent monitoring
Mapping is not an end in itself — it is the map that tells you where to place sensors permanently. The extreme points found in the study become the locations of permanent monitoring, because they will be the first to show a problem. Where humidity matters as well (15–25 °C zones, warehouses for packaging and leaflets), it is worth reaching for Nextriv Probe Duo: a single probe records temperature to ±0.2 °C and humidity to ±2% RH, with drift below 0.03 °C per year, giving a complete picture of the microclimate at the most difficult point.
Once you move to continuous oversight, the ordinary logic of zone monitoring applies: four thresholds per metric, escalation policies and six notification channels. How to set it all up is covered in our guide to cold zone monitoring.
Documenting the study
Mapping has to leave a trail that will stand up in an audit:
- A study report — the temperature distribution, the identified extreme points, conclusions and decisions about permanent sensor placement. The platform generates PDF reports with statistics and a compliance section, optionally signed with a SHA-256 checksum and a QR code.
- Raw data — an XLSX/CSV export covering the whole study period, for the validation file.
- History — a record available for years, in case an auditor wants to go back to the previous mapping.
Mapping checklist in 6 steps
- Define the goal and scope: which room, what target range, summer or winter variant.
- Design the grid: three height levels, densification in corners, by gates and air outlets.
- Deploy the sensors and record continuously for 24–72 hours of normal warehouse operation.
- Analyse min/max/avg and the spread, find the warmest and coldest points.
- Place permanent monitoring at the extreme points and set the thresholds.
- Generate the report and archive the raw data and conclusions.
A mapping run this way, and the permanent oversight that follows from it, closes out the requirements faced by pharmaceutical warehouses and wholesalers.
Want to see the sensor comparison and the study report on live data? Book a short demo or start with the pricing page — the free plan includes 10 sensors and a year of history, which is enough to run your first mapping.


