Sensors for commercial fridges and freezers — what to choose and where to mount it
Sensors for commercial fridges: how to pick hardware for cold rooms, counters and freezers, where to mount it and how to set temperature alarm thresholds.
Zespół Nextriv5 min read

In this article
A good sensor for a commercial fridge doesn't just show a number on a display — it measures continuously, speaks up on its own when the temperature drifts, and builds a history you can show an inspector. The trouble is that the market is full of devices that only do the first part: probe thermometers that have to be read by hand, or wireless gadgets that lose connectivity behind the first metal door. In this article we take apart what a sensor for a commercial fridge should offer, how the choice differs for a cold room, a counter and a freezer, and — just as importantly — where to mount it so it measures what it should.
What to demand from a commercial fridge sensor
Before you start comparing models, it pays to set a hard list of requirements. A sensor that is genuinely meant to guard food safety should:
- Measure continuously, not on demand. A reading every 10–30 minutes, around the clock, gives a dense timeline instead of three data points a day from a manual round.
- Send the alarm itself. A threshold breach has to reach a human immediately — by email, SMS, push notification — not wait for the next round.
- Work without cables or wiring. Battery power lasting years plus radio connectivity eliminate drilling into chambers and pulling wires.
- Not lose data when the internet fails. A local measurement buffer with automatic retransmission guarantees a chart without gaps — the foundation of credible documentation.
- Have formal grounds to act as a recorder. An EN 12830 certificate (the standard for temperature recorders in the cold chain) separates an audit-grade device from an ordinary thermometer.
That last point is a frequent hook during inspections — we expand on HACCP documentation in HACCP in practice — automatic temperature monitoring.
Fridge, counter, freezer — different requirements
Though all three are "cold", sensor selection and mounting locations differ.
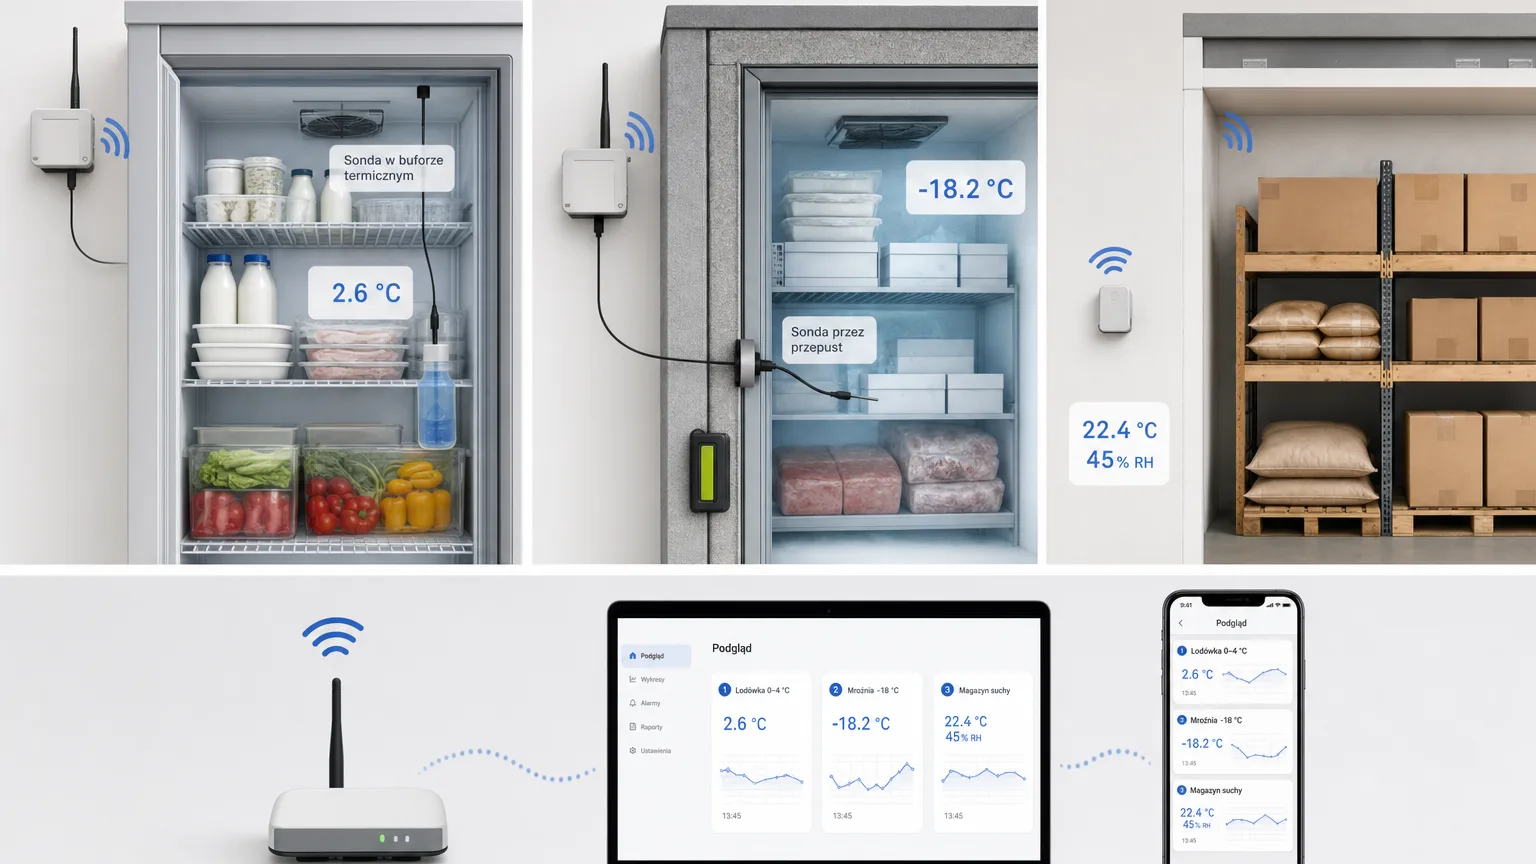
Fridge and refrigerated counter (0–4 °C). The biggest enemy here is false alarms after a door opening: the air warms up instantly, the goods only much later. The answer is to measure the temperature of the product rather than the air — the probe goes into a thermal buffer (e.g. a bottle of glycol or glass beads) that mimics the thermal inertia of the goods. A brief door opening then stops triggering an alert, while a real deviation still will.
Freezer (≤ −18 °C). The challenge is the sealed metal enclosure and a sub-zero temperature electronics shouldn't operate in. The "probe inside, transmitter outside" layout works well: the steel probe enters the chamber through a gland while the transmitter stays on the wall next to it, with good connectivity and a bearable temperature.
Dry store and back of house. Here humidity matters as well as temperature, and the device usually just hangs on a wall. The natural choice is an integrated temperature-and-humidity sensor in a sealed enclosure.
What to choose for refrigeration equipment
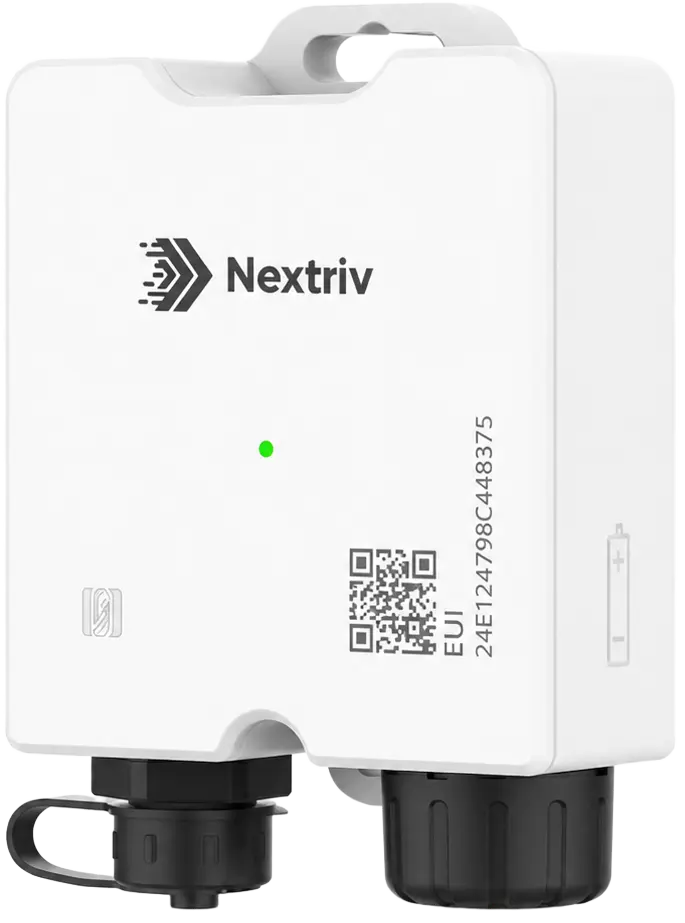
For fridges, counters and freezers the best fit is a logger with a detachable probe on a lead. Nextriv Probe Solo is EN 12830 certified, covers −40…+125 °C (one device will handle both the freezer and warm processes) with ±0.5 °C accuracy in the critical range. The detachable food-grade 316 stainless steel probe (M12 connector, 1.5 m lead) carries its own identifier reported in the data — you can pull it out for calibration or swap in a freshly calibrated one without touching the logger, and calibration traceability stays in the history. A buffer of 4000 timestamped measurements with retransmission guarantees recording continuity even after a connectivity gap, and roughly 8 years on a replaceable battery means you forget about the device for years.
It is precisely this separation of probe and transmitter that solves the two most common food-service problems at once: range (transmitter outside the metal chamber) and false alarms (probe in a thermal buffer). For the counter and the fridge, this is exactly the design you are looking for.
What to choose for the store room and back of house
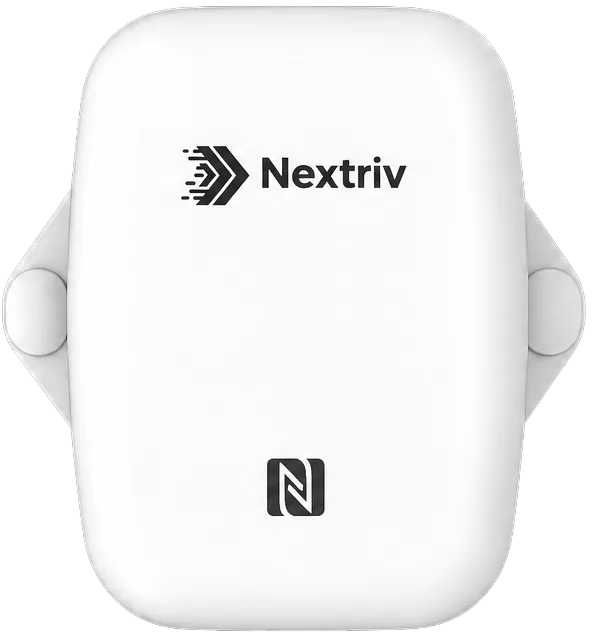
Where the device hangs on a wall and humidity matters too, reach for Nextriv Sense Essential — a temperature and humidity sensor in a sealed IP67 enclosure, also EN 12830 certified. The −30…60 °C range and ±0.2 °C accuracy (±0.3 °C below zero) cover the dry store, back of house, loading dock and receiving areas, and the UV-resistant enclosure handles indoor and outdoor mounting alike — the same model on the back-of-house wall and on the outdoor dock. The sensor keeps a non-erasable local record of nearly 3,000 measurements with automatic retransmission after a connectivity gap, and you configure it via NFC without opening the enclosure. Mounting is your choice: screws, 3M tape or cable ties — no electrician needed.
In practice many venues combine both devices: probe loggers for the refrigeration equipment and ambient sensors for the rooms. The same selection works in larger chambers and refrigerated warehouses too — we lay out that scenario on the cold storage solutions page.
Exactly where to mount the sensor
Good hardware in the wrong place gives misleading data. A few rules worth adopting as standard:
- Measure where the goods sit. Temperature distribution in a chamber isn't uniform — the area by the door and the upper shelves can be noticeably warmer. The measurement point should match where you actually store sensitive products.
- Avoid mounting right by the evaporator or the air outlet. A sensor there will read colder than the chamber average and give a false sense of security.
- In the fridge and the counter, use a thermal buffer. It's the simplest way to get rid of alarms after every door opening.
- In the freezer, leave the transmitter outside. Probe inside through an existing gland, transmitter on the wall next to it — reliable connectivity despite the metal and −20 °C.
- Don't hide the transmitter behind metal panels. Radio likes to "see" space; the wall next to the chamber beats the inside of a metal housing.
Thresholds and alarms — so the sensor actually warns
The measurement itself is only half the value. In the monitoring system you set up to four thresholds per metric: warning and critical, lower and upper. For a fridge running at 0–4 °C a typical configuration is a warning at 5 °C and a critical alarm at 8 °C; for a freezer — a warning at −18 °C and an alarm at −15 °C. A momentary swing after a delivery generates at most a warning, and only a real problem raises the event to critical.
Every breach opens an event with an ALM code and runs through the active → acknowledged → resolved cycle, while deduplication ensures a single active event per sensor and metric — instead of an avalanche of repeats you get one thread with a timeline. Notifications reach you where you work: email, SMS, web push, Microsoft Teams, Discord and an in-app audible alarm. On top of that come escalation policies: if the first person doesn't acknowledge the alarm within the set time, the notification moves up the chain — until someone does. The full scenario for a venue is described on the food service solutions page.
What does it cost?
Getting started is free: the FREE plan covers 10 sensors, 1 gateway, 2 users, 5 alert rules and a full year of measurement history — for a small restaurant with a few fridges and a freezer that is often the complete set. The PRO plan (99 PLN net / 30 days or 990 PLN net / year) removes the limits and adds, among other things, escalation policies, scheduled signed reports and 5 years of history.
Compare the plans in the pricing or book a short demo — we'll show sensors from fridges and freezers reporting live on a single dashboard.


